I had the chance to install the Sitecore Publishing service with the purpose of supporting a Sitecore 8.2 update 3 instance. I am a huge fan of this service already because prior to this service, publishing would have required waiting for a foreground process to complete before moving on. However, with the publishing service in place, that process no longer requires taking foreground resources so that I am free to continue working on something else in Sitecore while publishing takes place on its own. Because I would like to use this service as often as possible even on local development environment, I want to build a powershell script to quickly install this service on a local development environment so I can take advantage of this service as I do development work. I can see this activity being the norm in Sitecore in future versions rather than being an elective or suggested activity.
I wanted to discuss the process of installation in hopes that this will aid others who are trying to perform this same activity.
First Step – Pre-requisite: .NET Core 1.1.0 Windows Hosting
The Sitecore Publishing service is an ASP.NET Core based application and therefore may require software to be installed so it can be properly hosted. The needed software can be downloaded from this link. Once downloaded you can simply run the executable.
Second Step: Download the Service Package
Time to make sure that I download the publishing service package. You can start looking for those files using this link which point to the location with the Sitecore Developer Portal which references the Sitecore Publishing Service. This page lists the different versions of this service which is available. Since I was setting up the publishing service for Sitecore 8.2 update 3, I went with Sitecore Publishing Service 2.0 Update-1.
Just in case this is not clear, the “Sitecore Publishing Service” is the package you would use to set-up the background oriented process and the “Sitecore Publishing Module” is the package you would install on Sitecore which will interact the with the service. Once the service is in place for use and the module package is installed, all publishing will be done through the service and foreground oriented publishing activity will be discontinued on that Sitecore instance.
Once I downloaded the Sitecore Publishing Service zip file, I unzipped its content to a destination folder. I choose a folder under C:\inetpub\wwwroot since the service will be hosted in IIS. You can call the folder anything you like, such as “sitecorepublishing” and you can certainly host more than one on the same machine.
Third step: Create an IIS application pool
IIS will be used to host the Sitecore Publishing service. So we start with creating an application pool entry. An example of the settings is shown below…

Note the .NET CLR Version is set to “No Managed Code.” After this you are ready to create the IIS Website entry. An image of what could be the IIS entry website is shown below.

Nothing all that special about this part of the process, but now the service is hosted once this process is completed.
Fourth Step: Configuration
For the service to work correctly with your Sitecore instance, the service must be configured to find it. When I set this up the first time I use a command prompt as an administrator. The service needs to know the publishing instance host it is interacting with and the databases associated with the Sitecore instance it is supporting. First I changed directories to the folder holding the publishing service in the file system. Then I ran the following line to register the IIS publishing website entry with the publishing service.
C:\inetpub\wwwroot\sitecorepublishing>Sitecore.Framework.Publishing.Host configuration set Sitecore:Publishing:InstanceName -v sitecore.publishing
The next configuration step involved mapping the master, core and web database of the Sitecore instance to support as entries for the publishing service. As an example of the step I ran for the master database is shown below.
C:\inetpub\wwwroot\sitecorepublishing>Sitecore.Framework.Publishing.Host configuration setconnectionstring master "user id=sa;password=PWAzure2017;Data Source=.
\SC8SQLEXPRESS;Database=dmCom_Sitecore_Master"
You would perform similar steps for the core and web databases of the same instance.
Performing these steps will create configuration files in the /config/global directory within the Sitecore Publishing Service file system which will capture these changes. An example of the sc.custom.json file which captured the Sitecore Publishing host/instance name and the sc.connectionstrings.json file which captured the master, core and web database information is shown below.
sc.custom.json
{
 "Sitecore": {
 "Publishing": {
 "InstanceName": "sitecore.publishing"
          }
     }
}
sc.connectionstrings.json
{
 "Sitecore": {
 "Publishing": {
 "ConnectionStrings": {
 "master": "user id=sa;password=PWAzure2017;Data Source=.\\SC8SQLEXPRESS;Database=dmCom_Sitecore_Master;MultipleActiveResultSets=True;",
 "core": "user id=sa;password=PWAzure2017;Data Source=.\\SC8SQLEXPRESS;Database=dmCom_Sitecore_Core;MultipleActiveResultSets=True;",
 "web": "user id=sa;password=PWAzure2017;Data Source=.\\SC8SQLEXPRESS;Database=dmCom_Sitecore_Web;MultipleActiveResultSets=True;"
               }
          }
     }
}
Technically, you can create files similar to these and place them in the config/global directory and you should have the same result as running the command prompt code I demonstrated earlier.
The next step is to to create a new publishing table in the specified databases associated with the publishing process. The command prompt step appears like the following…
C:\inetpub\wwwroot\sitecorepublishing>Sitecore.Framework.Publishing.Host schema upgrade -f
Assuming everything is in place, you can test to see if everything is fine in terms of running the publishing service, by navigation to http://<publishing hosting name>/api/publishing/operations/status. If the page returns a {status:0}, your service is ready to go.
There are also powershell versions of these command prompt commands available. A set of powershell scripts called install and configure were stored with the original Sitecore publishing service zip files. This code can greatly assist in developing a powershell script which can be used to automate the entire process (note to myself on this 🙂 ).
Once you have completed the configuration, you should be ready to go so the next step. A quick test I have performed before is to do the following…
- Open Sitecore on the instance which will be accessing the publishing service.
- Create a content item which requires a workflow to complete like the “Sample Item.”
- Work through the workflow on that item until you reach the final state so that it becomes publishable.
- Check your web/live environment and see if the item appears automatically without requiring you to publish.
If it appears automatically, then the service is working. Completing a workflow on an item is a default publishing trigger of the service. Although the publishing service is now working with your instance, publishing triggered through the UI will behave the same as before, that is, forcing you to wait in the foreground until it is completed. If you want to take full advantage of what the publishing service does for you, install the publishing service module on the Sitecore instance already mapped to the publishing service.
Fifth Step: Installing the Sitecore Publishing Module
You would install the Sitecore publishing module like you would any package in Sitecore. What is important to do afterwards is to provide a configuration patch file which knows where to find the publishing service you are now hosting. These instructions are described when you install the publishing module. Below is an example of a configuration patch file placed inside the …\Website\App_Config\Include folder of the Sitecore instance using the service.
<configuration xmlns:patch="http://www.sitecore.net/xmlconfig/">
   <sitecore>
      <settings>
         <setting name="PublishingServiceUrlRoot">http://pubCM.publishing/</setting>
      </settings>
   </sitecore>
</configuration>
Once that is in place, when you publish now using the UI, each publish will be a background oriented process controlled by the service.
What I have also done is update the ConnectionStrings.config file (inside the Sitecore’s Website\App_Config folder) to include a MultipleActiveResultSets option with each the master, core and web database, just like what happened when the command prompt option was performed (examine the sc.connectionstrings.json file above).
Sixth Step: Try It Out
At this point, you should be able to run publishing through the new Sitecore publishing service. If all has gone well, you will have access to the publishing dashboard which keeps track of your publishing jobs running in the background. Example of this interface is shown below.
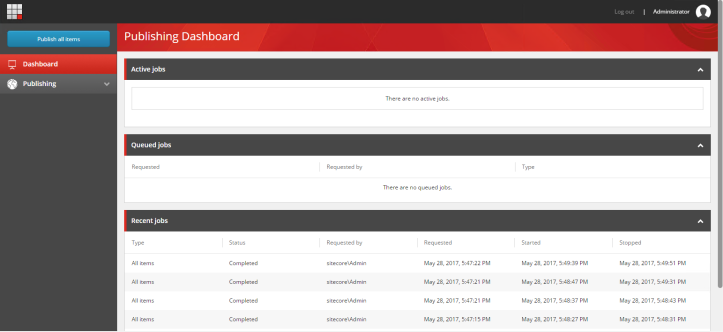
From this interface, you can also kick off a full site publish… As shown below, you can access this tool Sitecore’s XP Launch Pad or from the Content Editor.


At this point, anytime you launch a publishing event, the publishing service will manage the process. Because it is managed as a background process, the user is free to continue working instead of waiting for the publishing process to finish.
Closing Thoughts
I am a big fan of this service and can even see myself, using with future development environments because I would be free to continue to make changes in Sitecore without worrying about waiting for the publishing process.
Something else I am very happy about is that with this service there is a new role associated with having access to this publishing process. In setting up this process, you can give someone to ability to publish individual items with sub items or related items without at the same time given them access to a full republish… YEAH !!
Enjoy, it is a worthwhile service.
